
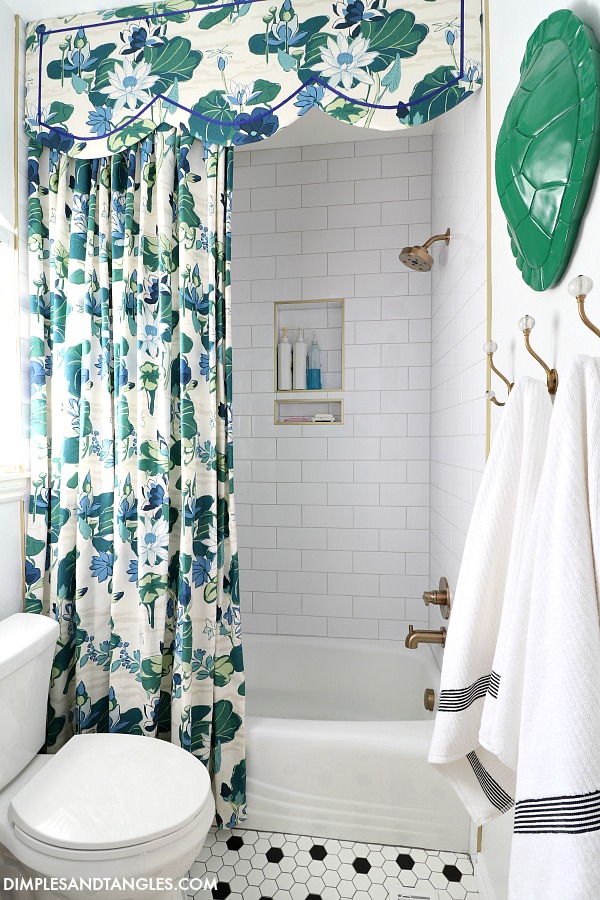
Without a doubt, our DIY shower curtain and cornice board is the perfect finishing touch of the kids' new bathroom. It wasn't too difficult to make and adds such a style element and warmth to the room. Today I'll share the tutorial with you of how we made it!
(*This post contains affiliate links, including Amazon. As an Amazon Associate,
I earn from qualifying purchases. Read my full disclosure policy here.)
First, I did some quick photo editing to "see" some of the shapes and styles I was considering in the space. I really liked several of them, but the scalloped design stole my heart from the beginning. I'll share how we created that one, but if you like one of the straight rectangle styles with decorative trim this project would be even easier!

This project kind of reminded me of making an upholstered headboard, but was a lot quicker and easier to work with. You'll just need a few supplies-
Plywood cut to fit the size of your shower opening, we used 1/4" to keep it lighter
Jigsaw if creating a shaped edge
High Loft Quilt Batting (crib size was plenty)
Fabric
Staple Gun (we have this one used with an air compressor but this one works great too!)
Ribbon Trim if desired
Tacky Glue
Corner Braces
Stud Finder, Possibly Drywall Anchors, Screws, etc. to install

When I bought the plywood at Home Depot I had the guys go ahead and cut it down to the right size for me. I basically made it the width of the shower opening, minus just a fraction of an inch to accommodate for the fabric and batting wrapped around the edge, but it didn't take much room. As far as the height of the cornice, I just played around with the proportions for our room. The ceiling in there is 9 feet, so my board from the top to the lowest dip of the cornice is about 19".
Next, I had to decide how deep I wanted the scallops to go. I marked out two options, either 3" or 4" deep. After dividing the length into 3 equal parts, I marked those measurements along the board where each of the "dips" would go. (If you just want a straight design for your cornice, skip this part!)

I couldn't find anything round that would fit exactly where I wanted the curve to go, so we used my sturdy but flexible cutting mat and lined it up at the deepest scallop points, aligning it with the bottom edge of the board to create the curve. You'll need an assistant to help you so you can trace the line while they hold the curve in place.

So you can see along the bottom a blue 4" outline and a pink 3" outline.

I liked the slightly deeper curves of the 4" mark, so that's the line I used as a guide to cut out the curve with my jigsaw.

So cute!

Next, you'll need to wrap the board with batting to give it some softness and padding. Lay the board on top of a piece you've cut, leaving a few extra inches of batting all the way around.

Then wrap snugly around the edges, making sure the batting is taut along the underside (which will be the front) and staple along the edge. Here's how I did the curves-


Now, you're ready to add the fabric. Lay it face down so the pattern will be on the outside, then the board on top of it.

One note, the fabric was not quite wide enough for the length of my board. I decided that I wanted to add on some right along the edge, knowing that I planned to add some trim and hoping that it would cover them up. Be sure to match your pattern and piece together appropriately if you're working with a patterned fabric. That was probably the trickiest part of this whole project!

Just like with the batting, cut slits in the fabric so you can work it around the curves. You'll need to cut it pretty close in the dip, but be careful not to cut it too far where the cut will show on the front. Just secure one staple along the curve at this point, then a few around the rest of the board, pulling the fabric taut.

Flip it over and make sure everything is straight and centered. If not, remove a staple where needed and adjust your fabric.

Then, start pulling and stapling all the way around. The scallop dips were the trickiest parts, I found it easiest to pull and staple as close as I could to the V, but then I hot glued the very center just a bit where I couldn't pull and staple as tightly. The glue will also keep the fabric from ripping and fraying any more at the end of the cut.

Make sure you're pulling the fabric tight from end to end as well, that will help remove puckers in the fabric along the scallop. Hard to see but I could have done just a bit better right in the tip of the V in pulling this one tighter from side to side.

Keep wrapping, pulling tight, and stapling all the way around. If you want to go the extra mile, cut a piece of fabric and hot glue on to finish the back and make it look pretty too, but I didn't do that!

Here's how the seams on the end turned out, pretty good!

All done and ready for the trim!

We actually hung ours before I had the trim I wanted to add, so I had to work on the ladder to add the trim- ha! Not too bad but add the trim first if you can. ;)
If you made a design with a curve, you're kind of limited on the trim you can use because it needs to be flexible to lay flat along the curve. Something like a gimp trim would work, but I couldn't find the color I wanted so I just stuck with grosgrain ribbon. Another tip, you can't use ribbon that's too wide or it won't lay flat along the curve. I tried 5/8" ribbon first and it didn't work, so I switched to 3/8" and it was ok.

I used a pencil to mark an edge for the ribbon, I think mine is about 2" in all the way around. I used my seams on the end as a guide because I wanted to cover those, then kept going all the way around. I didn't try to fold the ribbon when I needed to make a turn, I just cut it with sharp scissors and glued the end of the next piece on top and kept going. If you carefully hold the end of the ribbon right up to a flame from a lighter, it lightly melt the end and keep it from fraying. Use caution, if your ribbon is a lighter color it could look burned if you hold it too long. You could also use a bit of fray check on the ends instead if you're concerned about it fraying.

I attached mine with Tacky Glue, and found it best to "paint" it on with a small brush, getting it right along the edge especially on the edge that would be the top of the curve. I had to work it carefully around the curves and especially press it firmly along the top edge to get it to lay as flat as possible. You can still see a bit of puckering up close, but it's not noticeable from the ground.

I worked in small pieces all the way around, the top is a piece, each side, and each scallop curve.

Now, here's how we hung it. Normally, I would attach it to the wall. However, our tile comes out a little further than the front of the cornice and I didn't want to drill into the tile. So, we hung it from the ceiling. That's one reason I didn't want to use thicker plywood as well, wanted to keep it as light as possible. We used these corner braces and attached one side to the back of the cornice, then the other to the ceiling. We were full expecting not to find studs in the ceiling that were running the right direction, but miracle of miracles, there were some! If not, we were prepared to use drywall anchors to secure the ceiling screws. One other word of caution, if you used a thin plywood like I did, make sure the screws you're using on the brace section that goes into the plywood are really short. You don't want them to poke through the front of your valance and fabric when you screw them into the wood.

Here are the rods- I used two spring/tension shower rods hung side by side, one rod for the fabric and one for the plastic liner. I got this extra long liner and it's great!

One last little issue- since we suspended from the ceiling the bottom of the cornice hung a little crooked against the tile, the bottom tending to swing inward toward the shower. I needed to push the bottom out a bit, so I used some small clear command hooks to push the bottom toward the outside of the shower a bit and align it correctly. I just chose a hook because it had some bulk I needed to hold the board forward. Worked great! I considered just pushing the curtain rod tighter against the cornice to bump the bottom out, but that hindered the rings from sliding easily.


Not too pretty in the back but darling from the front!

By the way, the shower curtain is just lengths of fabric that I hemmed around the edges and added some buttonholes to the top for the shower rings. If you don't want to make button holes, I've also just sewn on two strips of about 3" long ribbons along the top before, then tied those to attach it to the shower rings. I made two panels that are just the width of the fabric each, so about 54" wide. I kept them separate rather than sewing them together into one big piece, so sometimes we can do one panel on each side if we want or push it all together to one side or the other.

This was really a fairly simple, doable project! So happy with the way it really finished off the room. I'd love to know if you make one!


SHOWER ROOM SOURCES
Tub/Shower Faucet || Subway Tile- Floor & Decor || Brass Schluter Metal Edge Trim- Floor & Decor || Subway Tile Grout- || Shower Curtain Fabric- (similar color here) || Extra Long Shower Curtain Liner || Shower Cornice Ribbon Trim- Joann || Soap Dish || Turtle Shell- past season Nate Berkus for Target || Towel Hooks || Toilet || Toilet Paper Holder

Jennifer, you must have the mind of an engineer to do all the things you do! This as well as the powder room paint design are great examples! 😊 I love this! So much more personal than just buying a shower curtain, which I do! Great job, colors and design!
ReplyDeletexo
Pat
Thank you so much, Pat. My Dad is an engineer so I guess I come by it naturally! ;) Good to hear from you, I hope you're doing well!
DeleteYou are so talented! Thank you for sharing all the details with us! It is beautiful!
ReplyDeleteThank you, I hope it comes in handy some day!
DeleteAmazing!
ReplyDeleteI may try doing our hall bath this summer while school is out and I have the time.
It is beautiful.
I hope you try it, keep me posted! Thank you. :)
Deletesuch a cool detail! i love the retro vibe of your bathroom!
ReplyDeleteThank you Cassie, we can't get over the change!
DeleteI am DOING THIS! Looks fabulous and so designer! Thanks for the tutorial! Will keep you posted! Now to find some fab fabric!
ReplyDelete