
Well, shoot. Remember on Friday when I told you I just had some finishing touches on the dining room table I'm refinishing? That meant all I had left to do was put on a top coat of polyurethane. I had stripped, scraped, sanded, filled, sanded, wiped, stained, wiped, stained, and done lots of waiting in between all of those steps!
I posted things like this on Instagram-
.PNG)
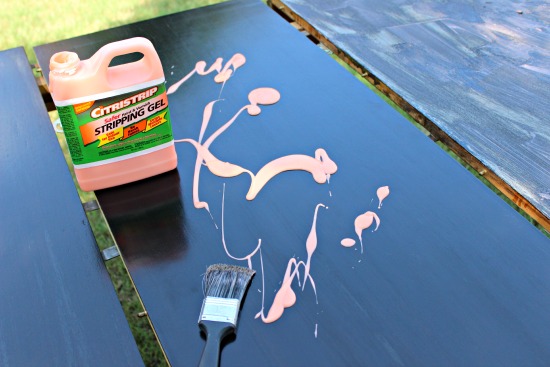
And then I put on the first coat of poly. And I waited 4 hours (or so). And then I put on a second coat. And after a little while I went to check on it, and there were cloudy streaks all over the top of the table. Hmmm, I've refinished several pieces and that had never happened before. So I waited until the next morning, thinking it must be drying unevenly.
 |
| (it was actually much worse than it looks here) |
In the morning, still there. And I knew something wasn't right. I tried to convince myself that maybe it looked like a cool faux-finish. My sweet daughter said she liked it and it kind-of looked like metal. I called the expert (a.k.a. my Dad) and picked his brain. He said to give it a day or two, that it might just be taking an extra long time to dry thoroughly.
I gave it another overnight, and nothing had changed the next morning. I knew there was nothing I could do but start over. Womp womp.
So, this is where I am.

I've re-stripped, re-sanded, and am currently re-staining. Yesterday I visited Munger's, my favorite Mom and Pop paint store, and sought some advice before I proceeded with a top coat again. I was really considering waxing the top this time, which I've never done on a refinished piece before. He strongly encouraged poly since it would be a high-use piece.
He also really felt that I probably didn't let the first coat of my poly dry thoroughly enough before applying the second coat, and the remaining moisture from the first coat just got trapped in there. He gave me a great tip to pass along. He said when you think your previous coat is dry, press your thumb in an inconspicuous place. If there is any stain or residue on your finger, or if it leaves your fingerprint or feels tacky at all, it's not dry yet.
For the record, I DID make an effort to follow directions on all of the products as I went along. The poly can was "fast-drying" and said to wait 3-5 hours between coats. I checked at around 4 hours and thought it was dry enough to proceed. Guess not. It's been SO hot and sticky here, I'm sure humidity was a very likely factor as well.
Here's hoping round 2 works out better! Just wanted to let you know, even with all the care taken to do things right, and even though I've done this before, in the world of DIY things don't always turn out the way they should. Sometimes, that's a happy mistake. And sometimes, you have to be willing to scrap it and start over. I like the first option much better.
What's your worst DIY fail?

with oil based poly more time is needed between coats (i usually give at least 24 hours) and after stain, same thing about 24 hours, and if the weather is warm and humid sometimes longer. good luck getting it done- it will be worth ll the effort in the ndd!
ReplyDeleteI hate when things don't go smoothly but DIY is such a learning process. I hope round two gets you the results you want :) xo Kristin
ReplyDeleteUgh, what a bummer!! Doesn't your heart just sink at times like this? It will be gorgeous this time and totally worth all the hard work.
ReplyDeleteOkay, maybe I'm weird, but I actually like the finish! It feels rustic to me ;) I know how you must feel though when you've pictured a finished product and gotten really excited about it and then it disappoints you :( I know it will be awesome in the end whatever you decide!
ReplyDeletesame thing happened to me a couple of days ago. I picked up a great tray at Goodwil. Sprayed it white and let it dry for "awhile". Came back later to do a gold spray paint line around the top, and for whatever reason it hadn't dried yet. So now I have a huge mess on my hands. It happens to all of us. I can't wait to see your table.
ReplyDeleteOh, what a bummer!! Kudos to you for starting back up from scratch. Knowing me, I'd probably makeshift it into something so I wouldn't have to do it all over again.;) I'm super excited to see the chairs you end up with...loving what you've been pinning!!! such a cool look!
ReplyDeleteAlways glad to hear I'm not the only one with DIY fails. I just blogged about my Epic Fireplace Fail last week. You are not alone - maybe we need to start a support group. :-)
ReplyDeletehttp://evolutionofstyleblog.blogspot.com/2013/08/confession-epic-fireplace-fail.html
I am so sorry after all your hard work, when you were near the finish line, that happened! Bummer! BUT it will be gorgeous when it's all done, the DIYer is nothing if not resourceful and I know round 2 will be better!! I have had MANY diys go wrong (remember my rattan chair I made a mess of?) I think it's wonderful that you posted about this so others won't think they are alone when it happens to them! We are all in this together sister :)
ReplyDeleteWhat a bummer! But, I can tell where you were going with it; and I am sure it will be gorgeous! I am not much of a DIYer, because I'm too impatient...lol!!!
ReplyDeleteIsn't that the worst feeling when you finally realize you really have to start over?! I guess the good news is you didn't have to redo those legs and apron! :) It's going to be gorgeous and worth all the trouble, we're all right there with you, I've had too many to count!
ReplyDeleteoh my gosh, how frustrating! Good for you to keep going. I get so annoyed when stuff like that happens I usually just scrap the project all together!! Keep going girl, it's going to look great!
ReplyDeleteHate when that happens. It happened to a piece I redid awhile back. Despite the fact that it looked and felt like I had scrapped/sanded all the old coat away apparently there was a bit left causing the poly to not cover evenly. I too didn't notice it until the rest of it was dry.
ReplyDeleteOh no, I hate when stuff like that happens. Good luck!
ReplyDeleteLove your willingness to show a challenge. I often feel like I'm the only one who has projects that go south! I have found that some of my worst failures (DIY or whatever) end up being my best lessons! Keep the blogs coming! I love, love, love them!
ReplyDeleteOh no! Frustrating to say the least! Ugh! :( At least you now have a pretty good idea as to what happened. Here's to round 2! ;)
ReplyDeleteMy worst DIY fail? (I have to pick just one? Lol.) Currently, my front door. Painted it black last fall and LOVE except don't look too closely. It started cracking just a few months after I re-did it. I think the problem was the paint I used the time before the black. So I sanded well before painting this time, but to no avail. I'm so disgruntled and haven't had time or money to re-do it yet. From the street it looks great. Just don't come for a visit. Lol. I followed the advice from the paint store guy...but I'm pretty sure he's in the wrong line of work. It's the 2nd time I've been misguided by them. Grrrr.
OH! That makes me mad for you. UGH. I would ask for a refund.
ReplyDeleteSo frustrating. It will be worth it in the end. Keep truckin!
ReplyDeleteI just saw your blog entry for Cassie at Primitive and Proper and wanted to come over and say hi!!! I loved looking at the pics of your house. You are very talented and I love your use of colors!!! I am now following you on bloglovin'!
ReplyDeleteoh no, that's the worst! I had some similar troubles with my dresser. I don't think I'm ever going to strip anything again!
ReplyDeleteThe exact thing happened to me a few years back when I stripped 8 antique dining chairs to bare wood and then re-stained them a dark rich colour. I was in a hurry as per usual and bought the mini-wax stain at Home Depot. I went to my regular paint store to get the poly and they gave me the stuff to give my chairs the sheen I desired. However, the mini-wax stain and the poly I got did not work together and I got those cloudy streaks. I was devastated but since it was 8 chairs I spot fixed them. They looked ok but I always knew something wasn't perfect about them.
ReplyDeleteThe fast drying poly doesn't work for me either. I had a similar issue with a vintage coffee table.
ReplyDelete